
 Tweet
Tweet
First let me say that by no means am I an expert at wood refinishing. This is just the method that I used, and in know way am I implying that this is the best or only way to refinish a birch stock set.
I would also like to mention Will77 who is a forum member here and got me pointed in the right direction.
Some of the items needed:
http://i133.photobucket.com/albums/q55/m1forme/IMG_2558.jpg
You will also need 0000 steel wool and a screen coffee filter.
As Received: Chocolate colored Springfield.
http://i133.photobucket.com/albums/q55/m1forme/002-1.jpg
http://i133.photobucket.com/albums/q55/m1forme/001.jpg
First step was to strip off the existing finish with Formby’s. Follow the directions on the can. Make sure you use it in a well ventilated area, preferably outside and wear heavy duty gloves. It took me three different applications to remove all of the finish. I used a Scotch brite pad to scrub the wood.
After Finish Removal :
http://i133.photobucket.com/albums/q55/m1forme/005.jpg
http://i133.photobucket.com/albums/q55/m1forme/011.jpg
Second step was to let the wood dry. I used a hair drier to speed up the process. If some of the original finish starts to bleed to the surface, just wipe it off .
Sand the wood lightly with the sanding sponges. I used the medium and fine. They work great because they are rigid enough to help prevent the rounding off of edges, but are still flexible enough to get the contours, like around the pistol grip.
Third step was to prepare the dye. Make sure you use latex gloves so you don’t color your hands. I used Rit liquid dye (not powdered) from Wall Mart, dark brown and scarlet. This was diluted with denatured alcohol also from Wall Mart. I like a reddish tint to a Garand stock, so this is why the scarlet was used. If you did not want the red tint it could be left out. This is the mix ratio that I started with. Five teaspoons of the dark brown: one of scarlet: twelve of denatured alcohol. I tested a spot on the underside of the rear hand guard. It was not red enough so I added one more spoon of the red and two spoons of alcohol. Tested again. It was still not red enough so I added ½ spoon of red and one spoon of alcohol. I liked the color and this was my final ratio. 5 brown: 2 ½ scarlet: 15 alcohol. * ( Since the original post I have found that by increasing the alcohol in the raito makes it easier to apply. My new raito is 5 brown: 2 1/2 scarlet: 30 alcohol.) After I was satisfied with the color, I strained my mixture through a cone shaped screen coffee filter. *(I have also found that the straining is really not necessary if you buff between coats with the steel wool.)
It is important that you do test areas because different wood and grain patterns will yield different results. It will also give you some practice at applying the stain and an idea at how long to leave it on before wiping it down and how many coats will be needed.. The longer it is left on, the darker the color will become. If I had a piece of birch wood laying around, I would have practiced on it first.
Testing The Color (left to right):
http://i133.photobucket.com/albums/q55/m1forme/016.jpg
Fourth step was to apply the stain. I used a foam paint brush to get all of the spaces inside of the stock and hand guards. On the outside surfaces I used a piece of an old towel to apply the stain. I tried to apply it as quickly and as evenly as possible with a moderate amount of rubbing. If you do it slowly and in small areas, it will dry and you will not be able to tell how evenly it went on.
Allow it to almost dry and then wipe it down with paper towels. I then lightly rubbed all of the wood with the 0000 steel wool. This helped even out the finish and removed any traces of residue. I repeated this process three times. Some of the areas on the stock, especially the end grain areas tend to get darker. I used the steel wool with a little more pressure to buff/ lighten these areas prior to the final stain application.You may or may not have to buff the final stain application with the steel wool. When buffing with the steel wool, be careful of the edges. Too much rubbing will easily remove the color and will leave a light spot. If you think that the stain is overall too dark, you can wipe down the wood with a clean rag soaked with the denatured alcohol to remove some of it.
Final step: Allow the wood to thoroughly dry for a few hrs.
I used Fairtrimmers for the finish. I applied it by hand on the outside and used a small foam paint brush to get all of the spaces inside the stock and hand guards. Some of the stain will come off, so don’t rub too long or hard. Let it dry for a few hrs. then wipe it down. You will notice that every time that you wipe down the final finish, some of the color will come off so you may end up with a slightly lighter color than before the Fairtrimmers was applied. I gave it one more coat and allowed it to dry overnight. The next morning I wiped it down with an old towel. The rifle can now be assembled and used. It actually took about 5 days before the finish was totally cured.
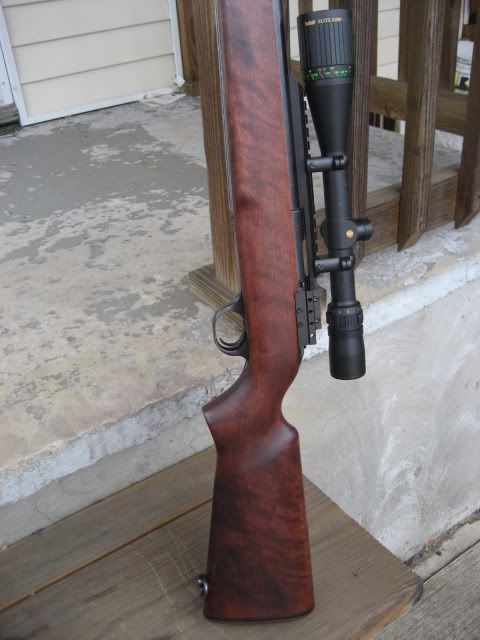
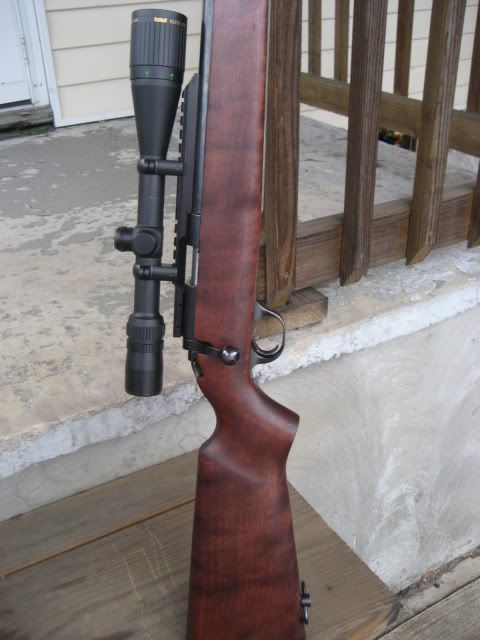
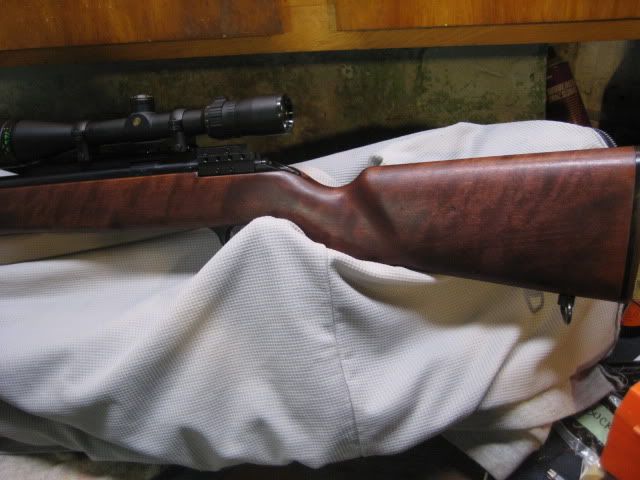
Completed:
http://i133.photobucket.com/albums/q55/m1forme/042.jpg
http://i133.photobucket.com/albums/q55/m1forme/031.jpg
This was a HRA orange stock set that I just did using the same procedure. However, I did increase the scarlet in the mix ratio from 5 : 2 ½ : 30 to 5 ; 3 ½ : 34 This dramatically increased the red color of the wood.
http://i133.photobucket.com/albums/q55/m1forme/IMG_2587.jpg
http://i133.photobucket.com/albums/q55/m1forme/IMG_2577.jpg
The actual procedure is relatively easy but it is somewhat time consuming.
Good luck.
Added 3/2/12
My most recent project was this H&R M12 stock. I don't have any before pictures, but this stock was real plain like a Ruger 10/22 stock an had some dents and scratches.
When the barreled action was removed from the stock, I noticed that it had been bedded. I did not want to damage the bedding material so I sanded off the existing finish rather then use a chemical stripper. Whatever the finish was, it came off easily.
The cool thing about Birch stocks is the striping that they could have. As I mentioned earlier, this stock was real plain with only a hint of striping on one side of the butt stock. After the dents were steames out, I decided to get a little daring and use a method that I had previously read about to see if I could give the wood a little more character. I got a propane torch and started to carefully heat the wood to darken it to try and duplicate striping. You have to be very careful doing this because it is very easy to burn the wood. If it does happen, you will have to sand the area to remove the charred wood. I think that a torch that burns cooler than propane would work better. Maybe butane? After The striping/darkening with the torch I gave the stock a light final sanding.
The stock was stained using the same method and ratio as above.
For the final finish , Formby's tung oil satin finish was used. It's also available in gloss.
I would also like to mention Will77 who is a forum member here and got me pointed in the right direction.
Some of the items needed:
http://i133.photobucket.com/albums/q55/m1forme/IMG_2558.jpg
You will also need 0000 steel wool and a screen coffee filter.
As Received: Chocolate colored Springfield.
http://i133.photobucket.com/albums/q55/m1forme/002-1.jpg
http://i133.photobucket.com/albums/q55/m1forme/001.jpg
First step was to strip off the existing finish with Formby’s. Follow the directions on the can. Make sure you use it in a well ventilated area, preferably outside and wear heavy duty gloves. It took me three different applications to remove all of the finish. I used a Scotch brite pad to scrub the wood.
After Finish Removal :
http://i133.photobucket.com/albums/q55/m1forme/005.jpg
http://i133.photobucket.com/albums/q55/m1forme/011.jpg
Second step was to let the wood dry. I used a hair drier to speed up the process. If some of the original finish starts to bleed to the surface, just wipe it off .
Sand the wood lightly with the sanding sponges. I used the medium and fine. They work great because they are rigid enough to help prevent the rounding off of edges, but are still flexible enough to get the contours, like around the pistol grip.
Third step was to prepare the dye. Make sure you use latex gloves so you don’t color your hands. I used Rit liquid dye (not powdered) from Wall Mart, dark brown and scarlet. This was diluted with denatured alcohol also from Wall Mart. I like a reddish tint to a Garand stock, so this is why the scarlet was used. If you did not want the red tint it could be left out. This is the mix ratio that I started with. Five teaspoons of the dark brown: one of scarlet: twelve of denatured alcohol. I tested a spot on the underside of the rear hand guard. It was not red enough so I added one more spoon of the red and two spoons of alcohol. Tested again. It was still not red enough so I added ½ spoon of red and one spoon of alcohol. I liked the color and this was my final ratio. 5 brown: 2 ½ scarlet: 15 alcohol. * ( Since the original post I have found that by increasing the alcohol in the raito makes it easier to apply. My new raito is 5 brown: 2 1/2 scarlet: 30 alcohol.) After I was satisfied with the color, I strained my mixture through a cone shaped screen coffee filter. *(I have also found that the straining is really not necessary if you buff between coats with the steel wool.)
It is important that you do test areas because different wood and grain patterns will yield different results. It will also give you some practice at applying the stain and an idea at how long to leave it on before wiping it down and how many coats will be needed.. The longer it is left on, the darker the color will become. If I had a piece of birch wood laying around, I would have practiced on it first.
Testing The Color (left to right):
http://i133.photobucket.com/albums/q55/m1forme/016.jpg
Fourth step was to apply the stain. I used a foam paint brush to get all of the spaces inside of the stock and hand guards. On the outside surfaces I used a piece of an old towel to apply the stain. I tried to apply it as quickly and as evenly as possible with a moderate amount of rubbing. If you do it slowly and in small areas, it will dry and you will not be able to tell how evenly it went on.
Allow it to almost dry and then wipe it down with paper towels. I then lightly rubbed all of the wood with the 0000 steel wool. This helped even out the finish and removed any traces of residue. I repeated this process three times. Some of the areas on the stock, especially the end grain areas tend to get darker. I used the steel wool with a little more pressure to buff/ lighten these areas prior to the final stain application.You may or may not have to buff the final stain application with the steel wool. When buffing with the steel wool, be careful of the edges. Too much rubbing will easily remove the color and will leave a light spot. If you think that the stain is overall too dark, you can wipe down the wood with a clean rag soaked with the denatured alcohol to remove some of it.
Final step: Allow the wood to thoroughly dry for a few hrs.
I used Fairtrimmers for the finish. I applied it by hand on the outside and used a small foam paint brush to get all of the spaces inside the stock and hand guards. Some of the stain will come off, so don’t rub too long or hard. Let it dry for a few hrs. then wipe it down. You will notice that every time that you wipe down the final finish, some of the color will come off so you may end up with a slightly lighter color than before the Fairtrimmers was applied. I gave it one more coat and allowed it to dry overnight. The next morning I wiped it down with an old towel. The rifle can now be assembled and used. It actually took about 5 days before the finish was totally cured.
Completed:
http://i133.photobucket.com/albums/q55/m1forme/042.jpg
http://i133.photobucket.com/albums/q55/m1forme/031.jpg
This was a HRA orange stock set that I just did using the same procedure. However, I did increase the scarlet in the mix ratio from 5 : 2 ½ : 30 to 5 ; 3 ½ : 34 This dramatically increased the red color of the wood.
http://i133.photobucket.com/albums/q55/m1forme/IMG_2587.jpg
http://i133.photobucket.com/albums/q55/m1forme/IMG_2577.jpg
The actual procedure is relatively easy but it is somewhat time consuming.
Good luck.
Added 3/2/12
My most recent project was this H&R M12 stock. I don't have any before pictures, but this stock was real plain like a Ruger 10/22 stock an had some dents and scratches.
When the barreled action was removed from the stock, I noticed that it had been bedded. I did not want to damage the bedding material so I sanded off the existing finish rather then use a chemical stripper. Whatever the finish was, it came off easily.
The cool thing about Birch stocks is the striping that they could have. As I mentioned earlier, this stock was real plain with only a hint of striping on one side of the butt stock. After the dents were steames out, I decided to get a little daring and use a method that I had previously read about to see if I could give the wood a little more character. I got a propane torch and started to carefully heat the wood to darken it to try and duplicate striping. You have to be very careful doing this because it is very easy to burn the wood. If it does happen, you will have to sand the area to remove the charred wood. I think that a torch that burns cooler than propane would work better. Maybe butane? After The striping/darkening with the torch I gave the stock a light final sanding.
The stock was stained using the same method and ratio as above.
For the final finish , Formby's tung oil satin finish was used. It's also available in gloss.


Comment